Homebrew Pinball #3, Part 35

Cross posted from the original Pinside thread, this is one of many posts regarding my third homebrew pinball machine, creatively nicknamed 'P3'


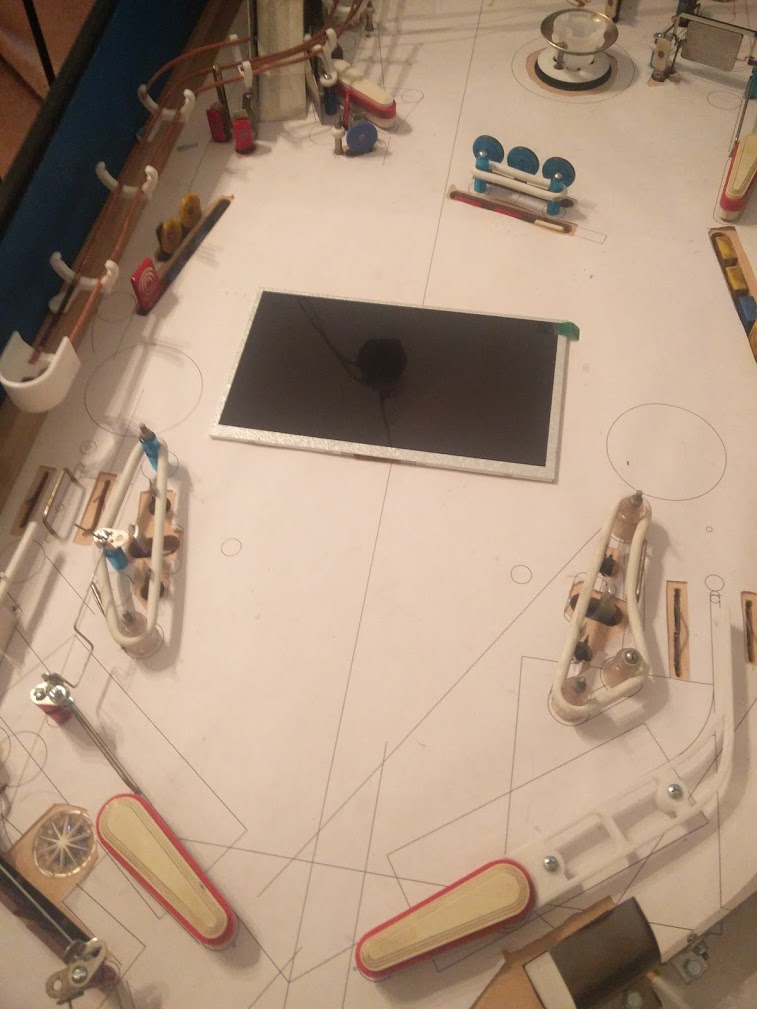
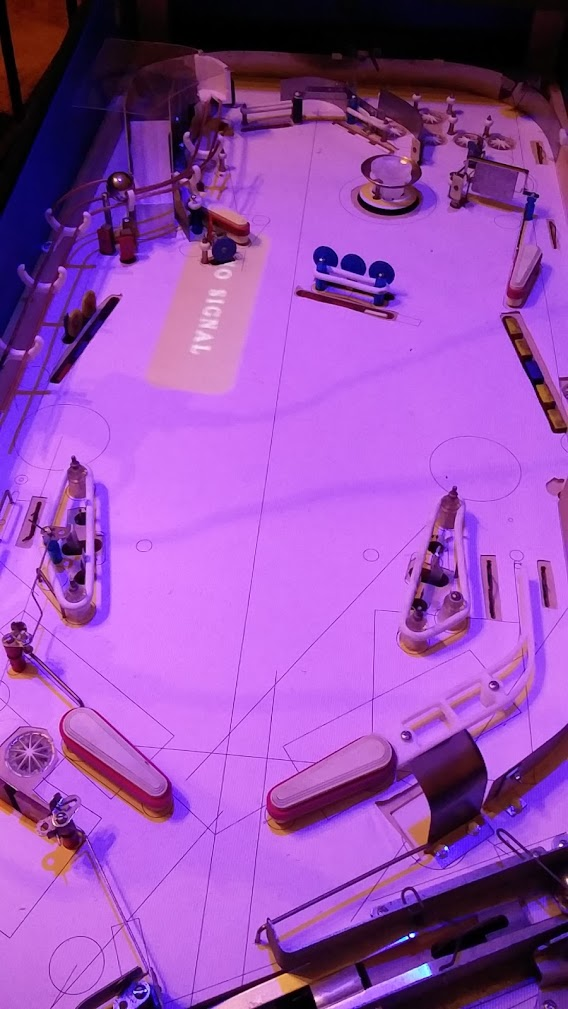
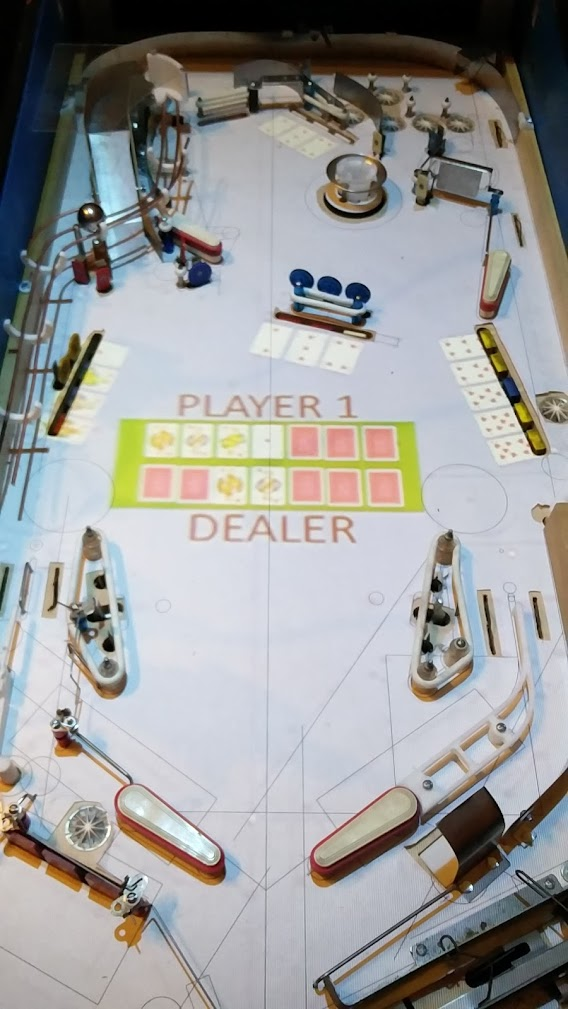
3D printed some brackets for the screen. It's funny, prior to getting a 3D printer "how do I mount a screen under the playfield?" was a really big question mark on my project's todo list. With a 3D printer, I had it mounted just fine with 5 minutes of modeling.

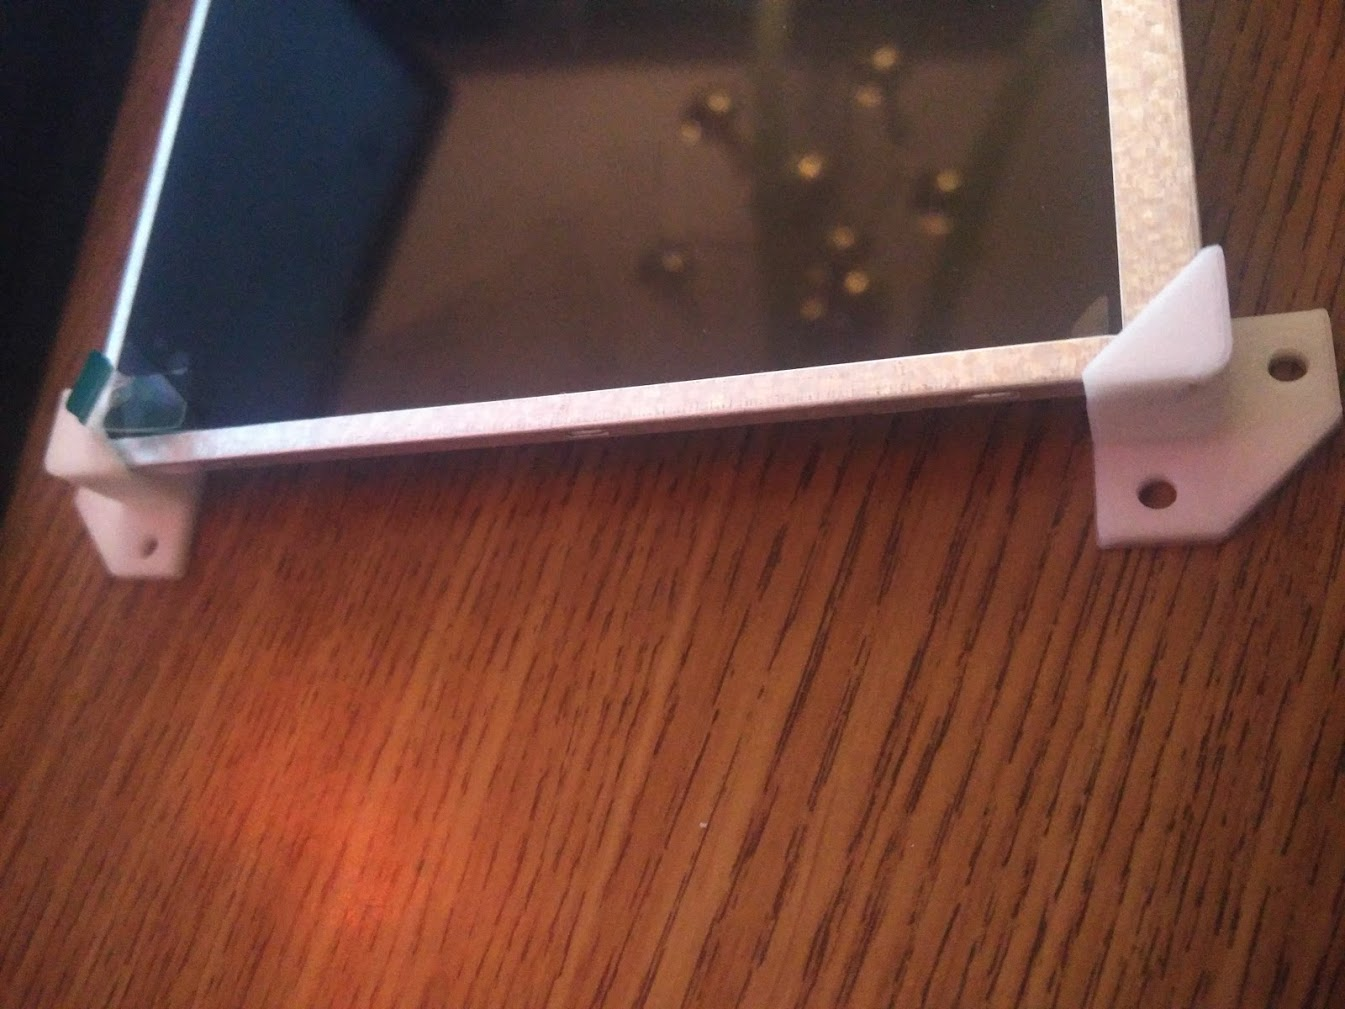
Made a test screen hole in my testing playfield plywood. Messed up the cut spectacularly somehow, my whole rectangle was like 1/4" skewed. Not sure how I managed that when I made it by tracing the screen, but oh well.

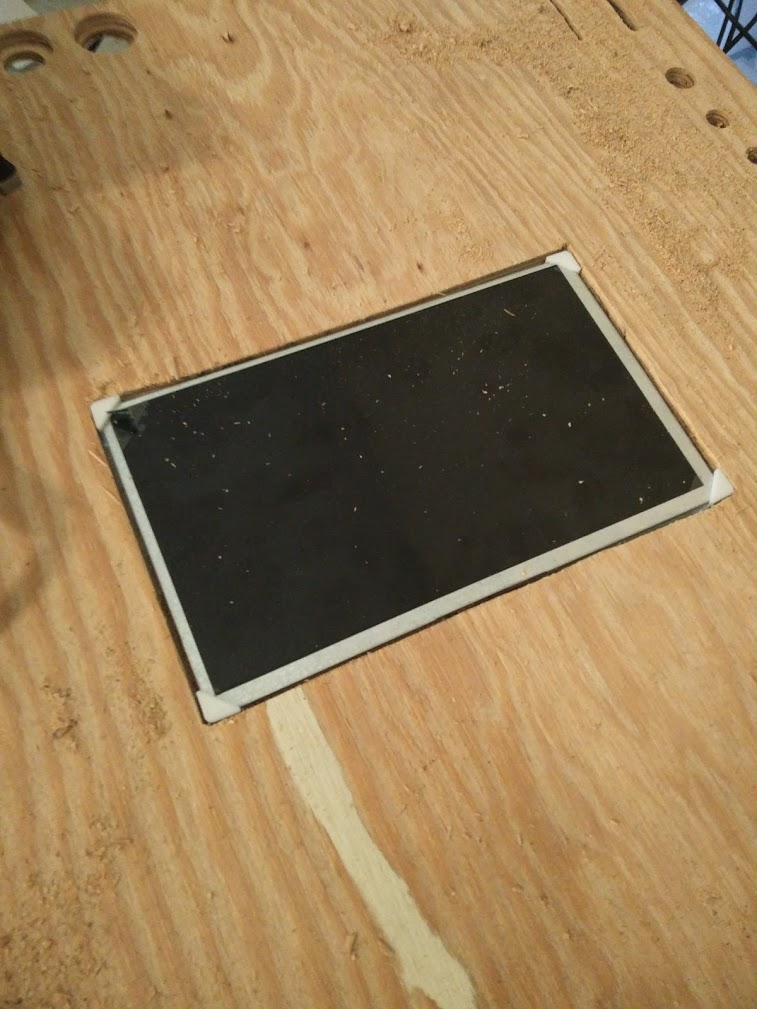
I also tried mounting a test piece of 1/16" lexan over the hole, to see how much it deformed. I screwed it in at the same positions that the nearest posts are on the real playfield, to get an idea of how well it'd be held down. I had problems instantly with a bit of warping, since my holes weren't placed perfectly.
I think that to use this on a real playfield I'd need to pre-drill all the screw holes with a slightly larger bit, so it has some room to slide around while I'm tightening everything down. Then I'd have to work from the center outwards as I attached everything to try to keep it taut.

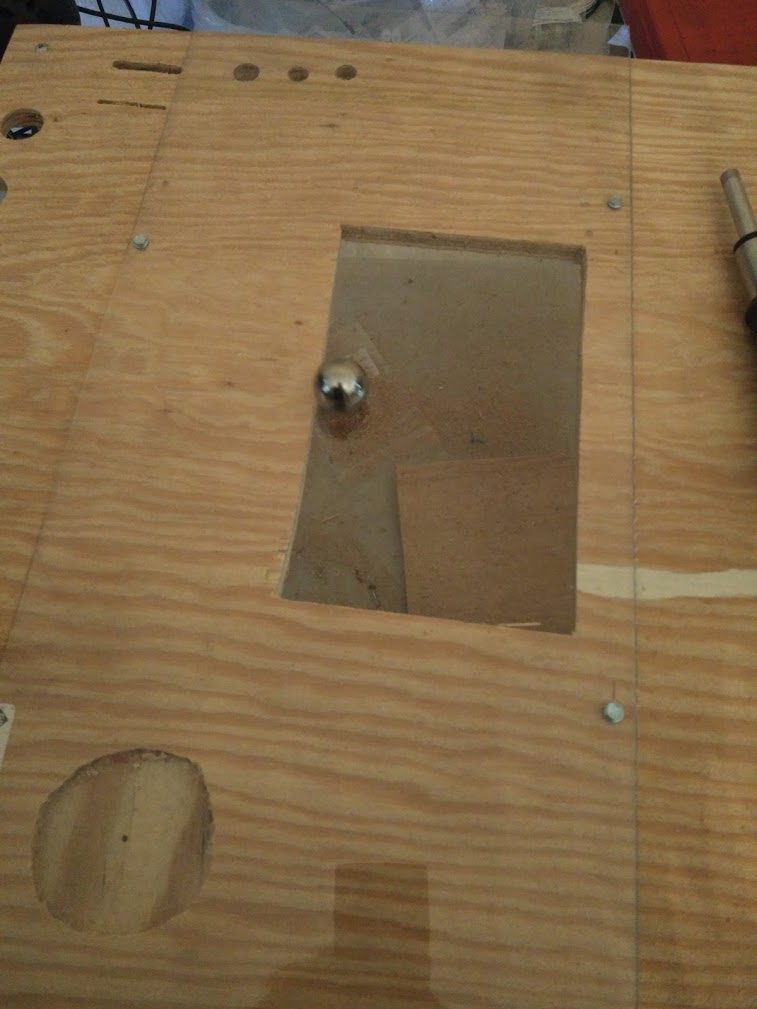
My initial test of 'pressing it down with a finger' didn't seem very promising. I could flex the hole down way more than I can on my Black Hole. I still don't understand how the super thin window on black hole is so sturdy when every plastic I've looked at is so much more flexible...

In the end though, I realized I shouldn't be testing with my finger, but with a ball. Setting a ball in the middle of the hole has almost no effect on it, and it seems to roll across it fine. At worse, I can always make a second layer of plastic just for the screen, to bridge that section if it becomes an issue, so this approach still seems viable.

Another benefit I thought of is that I could conceivably mount my magnets way closer to the ball. With wood on top of the magnet, it seems like most playfields are still retaining 1/2-3/4 of their thickness to keep the wood solid, which means the magnet is probably about 3/16" away from the ball in the best case. With a plastic covering, I should be able to cut that down, which should make the magnet stronger, and might help with my issues on the upper magnet. I'm not very familiar with the physics of magnets though... I'm curious how this would compare to the large metal cores on games like TWD. Is a 3/16 thick, 3" wide metal core on top of a magnet generating a larger field than the entire winding itself does?

Next I need to figure out if I can use my star rollovers with it. I used them a lot in the design since they're easy to cut the holes for (compared to a rollover switch slot), but I know I've heard about issues with them and playfield protectors...

Posted Thursday, October 15, 2020
at 09:38 AM


Tags: Blog Post, Pinball, Project, P3,

Homebrew Pinball #3, Part 34

Cross posted from the original Pinside thread, this is one of many posts regarding my third homebrew pinball machine, creatively nicknamed 'P3'


Received my replacement screen today:

Will try to hook it up this weekend and get it displaying some images, then do some text cuts on my spare plywood to figure out mounting, and see how well my lexan sheet will work.

In other fun, my flippers have suddenly gotten very weak (can barely make it up the ramp). I hadn't actually had the game on in the past week or two since I'd just been working on code, so I have no idea how long it's been like this. Always a fun issue even on regular machines, so I'm sure it'll be fantastic trying to track it down here...

I wish there was a reliable way to quantify flipper/coil strength so I could really check on stuff like this, make sure I'm not going crazy, etc...


Finally tracked down my weak flipper issue... I replaced the bridge, no change. Replaced the capacitor, no change. Checked signals with a scope, everything looked okay. Cap smoothed the signal out well, peaks were proper height, everything seemed proper. Then I realized... the fuse was blown. I never even considered checking that, since obviously the flippers were working. Something about the way I hooked up two bridges in parallel, one with a smoothing capacitor on it, must have allowed enough voltage to build up through just one side of the AC, through a common ground or something, that allowed it to still get the flippers enough power to flip. Not really sure how that could be, but. I thought I had replicated the circuit gottlieb used on black hole accurately, but the one difference was that I had a separate fuse for each bridge (although I only fused one side of the inputs) while Gottlieb had a shared fuse for both bridges.
I assumed that was just a cost saving measure, but maybe it's actually because of this?

I also realize now, looking at the schematics, that they don't actually fuse the DC side of the bridge, which is interesting. I guess they figure that the per-coil fuses will usually catch those issues? I guess they usually do, at least in my experience. I definitely didn't fuse my solenoids enough overall. I put separate fuses for each flipper and bumper, but the controlled coils only have the one shared fuse on their driver board. More concerningly, I've never blown the on-board fuses for some reason, but I have blown the rectifier fuse when a coil locked on, despite the rectifier fuse being 8A slow blow and the on-board being a 4A fast blow. Hopefully that doesn't become an issue.

I've also designed another iteration of my driver board since my rev 7 that I assembled still had mistakes, though I haven't ordered it yet since I'd like to get some more boards done for a combined shipment. This time, I restarted from scratch. My previous schematic had been carried over and repeatedly modified since my original rev 1 board back when I started learning how to design boards, and was a bit of a mess.
Before:
After:

I'd also been repeatedly running into issues when designing the boards trying to fit them in a 2x4" footprint. Over time I went from 13 FETs to 16, added driver chips, fuses, test points, indicator LEDs, etc while still using the same size board, and it had gotten really hard to layout. This time I scrapped the voltage indicator LEDs, and dropped from two fuses (one for each bank of 8 drivers) to one fuse. Originally, I had designed the board so each bank could be operated completely separately, and could be configured with pullups for PNP transistors or pulldowns for NPN transistors, so that it could also be used to drive an 8x8 lamp matrix, but that use has sorta disappeared in the intervening years.

Those part removals combined with some tricky layouts let me finally get all the transistors layed out neatly. This also means that I can now stick both solenoid connectors on one side, and keep all the low voltage signals on the other side of the board, to clean up the wiring a bit more

Rev 7:
Rev 8:


Yesterday my second screen shipped out, so of course today my original screen I ordered from China arrived out of the blue.. Only took 2 and a half months. This one included a USB power cable, which is nice since now I won't accidentally fry anything by using -12V, but it's also weird, since USB is 5V. As far as I can tell, the boards are identical. Not sure if there's something I can't see that's different or if one of the sellers was wrong about the supply. Was also able to confirm that my first screen is still good, so I must have only damaged the driver board, so now I've got a backup. And soon I'll have two boards and 3 screens. My attempt to get a cheaper screen from china has now cost me about $130 I guess that's what I get from ordering something from overseas during a pandemic though

Posted Tuesday, October 13, 2020
at 10:15 AM


Tags: Blog Post, Pinball, Project, P3,

Homebrew Pinball #3, Part 33

Cross posted from the original Pinside thread, this is one of many posts regarding my third homebrew pinball machine, creatively nicknamed 'P3'


My screen still hasn't arrived, so I gave up and ordered another one. Hopefully it will arrive eventually..

In the mean time, I tried out an idea I'd been toying with for a while. I don't know where any of my lights will go, or how the art will look, and it's hard to play with that, so why not make some temporary artwork?

I dug out an old projector, and hung it from a 2x4 sticking out from my upstairs landing, and lined up the game underneath, then I loaded up a quick mockup:

I expected it to be a bit hard to play like this but it was actually surprisingly easy to ignore and play like normal. The quality isn't very good though; the cards aren't readable even at 1080p. With a 4k projector this might be workable beyond rough prototyping, but it'll probably work for now. I also had to put the projector really high up, probably 10+ft off the ground. Gets to be a real pain turning it off and on without a remote

With this I'm hoping I can get the game much more fleshed out before needing to commit to making a new playfield and moving everything over

Posted Tuesday, October 13, 2020
at 10:14 AM


Tags: Blog Post, Pinball, Project, P3,

Homebrew Pinball #3, Part 32

Cross posted from the original Pinside thread, this is one of many posts regarding my third homebrew pinball machine, creatively nicknamed 'P3'


Coded the logic for actually determining which hand won, and displaying the best 'hand' from each hand of 7 cards. The code for finding pairs, straights, etc was surprisingly simple and fun to write.

Since it can identify what hands you got, I can now tie that into what modes/multiballs are enabled at that point. Unsure what I should do if you manage to get multiple different hands.

For instance, what if you manage to get three pairs? Technically only your better two pairs will count as far as the poker game goes, but if each pair qualifies a mode, should you have the choice of which one(s) to play? Should only the higher two pairs' modes be lit, effectively making lower cards' modes harder to get?

If you get a straight and a pair, and then you play the mode you get from the pair, does the multiball you got from the straight go away, or could you go play it after finishing the mode?

If you qualify a mode, but then immediately go into the shooter lane to start another round of poker, should you lose that mode, or should it still be available? Should you be able to start a mode mid-way through a hand?

So many questions... Luckily the decisions on these aren't really hard to change the code for, they could even be settings technically, although I'm not going to bother coding any settings menu or anything since I can just edit the code I'll probably go with the most restrictive options for now (if you take a mode you lose your multiball, etc) just so I don't have to deal with coding a mode select screen yet.

Posted Tuesday, October 13, 2020
at 10:13 AM


Tags: Blog Post, Pinball, Project, P3,

Homebrew Pinball #3, Part 31

Cross posted from the original Pinside thread, this is one of many posts regarding my third homebrew pinball machine, creatively nicknamed 'P3'


Coded some initial spinner rules. First time you shoot the spinner, it stops it in the upper lanes. Next time it orbits around back to the left flipper for a 2x spinner shot, and stops it in the lanes. Then you get two orbits before it stops it, etc.

Coding this was way harder than that sounds, due to me not really thinking about 'shots' and such when I designed the playfield. A ball shot through the spinner could go in one of six lanes. Or it could fall back through the spinner. Or fall down the shooter lane. Or it could manage, theoretically, to go below the left one way gate and continue on to the left. When the gate is open, it will usually go all the way around, triggering the left orbit switch and the left inlane on its way down. But it could also fall short into the upper eject, or go under the ramp, or fall even shorter into any of the lanes, etc from before.

Originally I figured I didn't need to care about this too much. I'd just consider a shot to the spinner as whenever the spinner suddenly spun a few times. But when I'm purposely designing the code to let you repeatedly rip the spinner, it's very likely the spinner will still be spinning somewhat by the time you rip it again, or you could even go right under it while it's spinning, so I ended up with a ton of code for different edge cases trying to detect when the player does a successful orbit or not, multiple timers going on, etc. It's a bit of a mess, and it's going to be even more of a pain to debug if something goes wrong.

It would have been really nice to close up some of the areas a bit more so I could know 'for sure' whether a ball passed through there, rather than having a big open area up there for the ball to bounce around in. Too bad big areas for the ball to bounce around in are fun...

Scoring wise, I'm trying to sorta take a page from Meteor, since I like the way its spinner value is continually fluctuating. For the first iteration of that, my attempt is to make the spinner score more when you having matching numbers of drop targets down on each bank. For instance, the spinner starts at 10 points. You knock down one target on bank A, that goes up a bit. You knock down one target on bank B as well, that number goes up even more. Two targets down on each bank is better than one, etc. I'll try to balance it so you can get the spinner up really high, but at the same time if you hit one stray target it may ruin it completely.

Hopefully this will also encourage people to 'shoot around' more, instead of finding one or two banks they feel safer on and just picking targets off those

Posted Friday, October 02, 2020
at 10:58 AM


Tags: Blog Post, Pinball, Project, P3,

< Newer Posts
Older Posts >

Posts per page: 5 10 25 50 100